Pære klasse Barne: foto, beskrivelse, regler for vekst
Innhold:
Artikkelen presenterer barnas pæresort: foto, beskrivelse, egenskaper, veiledning for omsorg, beskyttelse, dyrking.
Pære klasse barn: foto, beskrivelse
Pæreklasse for barn
Ifølge nylige undersøkelser er Barnas pære et av de mest populære frukttrærne som vokser av både nybegynnere og profesjonelle gartnere.
Folk tiltrekkes ikke bare av den utrolige upretensiøsiteten til denne planten, men også av hvor velsmakende og mange fruktene er. Det er derfor pæretreet blir mer og mer populært for hvert år, og oppdrettere fortsetter å utvikle helt nye og revolusjonerende varianter.
Dette skjer ved å krysse eksisterende varianter som har nyttige og uerstattelige kvaliteter. Som et resultat av nettopp en slik genetisk kryssing, dukket det opp en pæresort kalt "Barnas".
Til tross for sitt enkle og naive navn, er denne sorten med rette blant ikke bare de mest dyrkede, men også objektivt sett de beste pærene i hele verden, og derfor bestemte vi oss i denne artikkelen for å fortelle deg alt som er kjent om denne sorten, slik at du kan problemer med å dyrke den på nettstedet ditt og glede familien din med utrolig velsmakende frukt.
Hvilken gruppe gjør
Det er forskjellige grupper av pærer som inkluderer helt forskjellige varianter. Prinsippet for inndeling i grupper er som følger: det er sommer-, høst- og vintertrær. Som du sikkert forstår, tilhører trær der frukt modnes om sommeren den første gruppen, de der de modnes om høsten - til den andre, og de der frukt modnes om vinteren - henholdsvis til den tredje.
Vårt diskusjonsobjekt, Barnas pære, tilhører sommergruppen. Fruktene modnes mellom juli og august. Noen ganger, hvis værforholdene var ugunstige, kan denne perioden utsettes til begynnelsen av september, men slike situasjoner er unntak fra regelen.
Variasjonshistorie
En pæresort kalt Children's ble avlet av en veldig berømt og profesjonell oppdretter, for hvis skyld det er et stort utvalg av forskjellige plantesorter. Han het Yu.A. Petrov og N.V. Efimov. Sammen ved All-Russian Institute of Breeding and Technology i Moskva skapte de denne enestående varianten, som i fremtiden sørget for at de mottok mer enn én pris.
Det er også pålitelig kjent hvilke hybrider som ble opprettet for å få en pære når den krysses. Det var en pære som heter Summer Duchess og en hybrid variant nummer åtte som ikke har noe vitenskapelig navn.
Oftest kan denne variasjonen finnes i våre regioner, siden den er utmerket for værforholdene og derfor ikke er veldig vanlig i utlandet.
Likevel har vi populariteten til Baby Pear, som du sikkert vet, er på sitt beste.
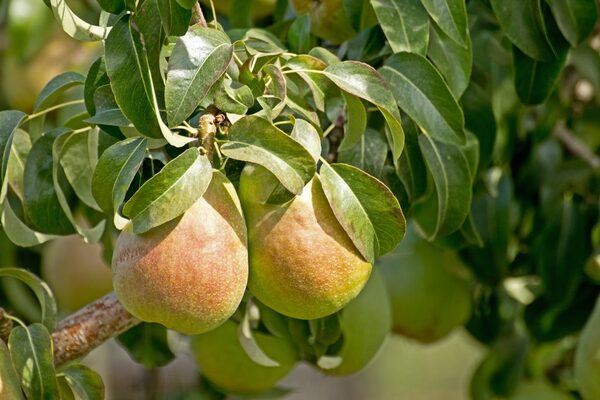
Pære klasse Barne: foto, beskrivelse av botaniske egenskaper
Pæreklasse for barn
Trær av denne sorten i høyde når ganske imponerende størrelser, og følgelig er de ekstremt holdbare og kan tjene en gartner i mer enn et dusin år. Kronen til disse trærne er i form av en pyramide.
Grenene som danner den er ganske få. Imidlertid er de veldig kraftige og forgrenede, noe som gjør at de kan danne et stort antall blader og frukter på seg selv.
Skuddene på treet er små, men veldig rette og tykke.
Når det gjelder bladene, svarer de ikke i det hele tatt til de ganske store dimensjonene til selve treet og presenteres oftest i ganske små størrelser. Imidlertid er de ganske vakre og har riktig spiss geometrisk form.
Deres overflod gjør at treet kan motta mye energi gjennom fotosyntese og la det vokse, bli enda større og sterkere.
Fruktene av denne planten, men som bladene, kan ikke kalles gigantiske sikkert. Imidlertid er de ikke små heller. Vi kan si at de er av middels størrelse, og deres masse når omtrent åtti (i sjeldne tilfeller - hundre) gram.
For å avgjøre om frukten har nådd modenhet, er det nok bare å se på dens gulhet. Til tross for at pæreskyggen er lysegrønn, jo mer gule de blir, desto mer modne er de.
Noen ganger kan du også finne små oransje-rustne flekker på dem, som utfyller fruktens enkle, men elegante utseende, noe som gjør deres salgbare utseende enda bedre og mer attraktivt for kjøpere.
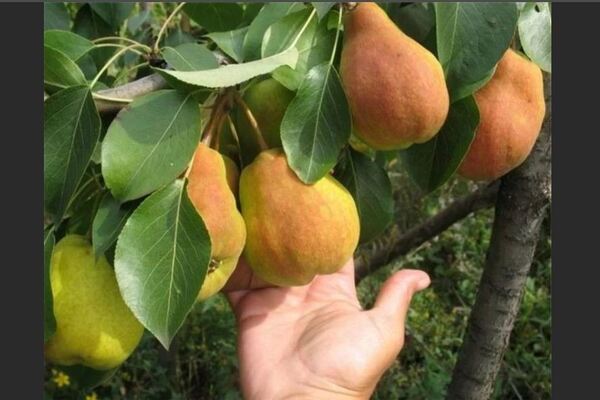
Barnas pære: beskrivelse av sorten, bilder, egenskaper

Barnas pære
Utbyttet av babypæren er imponerende og kompenserer virkelig for at det langt fra er den mest imponerende størrelsen på frukten. Imidlertid må du vente omtrent fire, og i noen tilfeller til og med fem år før du har mulighet til å høste frukt fra dette treet.
Likevel er selv slike perioder en ganske sparsom ventetid, siden vi, med tanke på noen andre varianter, vil kunne finne ut at fruktens utseende på dem kan leve i sju eller åtte år.
På denne bakgrunn skiller pæren seg tydelig ut på forsommeren.
Som allerede nevnt kan du begynne å høste i begynnelsen av juli, og denne prosedyren kan ende allerede på slutten av sommeren, siden fruktene modnes ujevnt. Derfor bør du under ingen omstendigheter samle frukt på en dag. Det er mye bedre å strekke denne prosessen over flere uker for å spise overmodne pærer eller omvendt for ikke å plukke dem undermodne.
Når det gjelder smaken av sorten, bemerker mange gartnere og forbrukere at de foretrekker denne pæren nettopp på grunn av dem.
Kjøttet på dette treet er veldig mykt og silkeaktig. Den er også saftig nok til at den kan brukes på helt andre matlagingsområder: pærer kan spises rå, eller til desserter, kompotter og til og med noen sauser.
Det skal også bemerkes at disse fruktene har en veldig god konservering, og derfor kan de ved passende temperaturer lagres ganske lenge. Babypæren kan selvfølgelig ikke konkurrere med varianter hvis frukt varer opptil seks måneder, men å holde frukten frisk i en måned er ikke et problem for denne sorten.
De positive egenskapene til denne pæresorten inkluderer dessuten frostbestandighet. Sikkert kan det til og med bemerkes at denne faktoren var langt fra den siste av disse, takket være at denne sorten har slått så godt rot i vårt land.
Trærne tåler ikke bare effekten av ganske lave temperaturer, men de er ikke skadet på noen måte og forblir helt intakte.
I tillegg takler Barnas pæresort godt plutselige endringer i værforholdene, noe som ofte er et problem for noen andre pærer, og derfor tolereres vårfrost eller plutselige høsttining av dem uten problemer.
Vel, og selvfølgelig er den utvilsomme fordelen med denne sorten at den er helt selvfruktbar, og når du planter den, trenger du ikke engang å tenke på å plante andre trær i nærheten som kan fungere som pollinatorer.
Plante og ta vare på planten
Mange gartnere foretrekker å dyrke pærer, og forsømmer andre hagetrær, fordi pæreomsorg er utrolig enkelt, og treet er helt upretensiøst. Forresten, som vi sa, er dette en av hovedårsakene til den enorme populariteten til denne variasjonen blant nybegynnere og ikke-profesjonelle gartnere.
Likevel bør prosedyrene for omsorg for denne planten, selv om de slett ikke er kompliserte, være ekstremt regelmessige og konstante, siden det er disse egenskapene det er det trærne elsker og respekterer mest, og derfor belønner de gartnere. gi dem verdig omsorg, en anstendig høst.
Først av alt, selvfølgelig, må du ta vare på plantingen, for det er ikke for ingenting de sier at det er i plantingen at minst halvparten av suksessen til den fremtidige planten ligger. Det er derfor du må følge reglene som er beskrevet nøye for å gjøre treet ditt mest effektivt og produktivt.
Pære klasse Barne: utvalg av frøplanter
Faktisk begynner plantingsprosedyren lenge før du graver et hull for frøplanten og planter den i den. Denne prosessen begynner nøyaktig med valg av riktig og sunn frøplante, siden hvis valget ditt faller på ikke godt nok plantemateriale, kan du bli skuffet over hvor ineffektivt treet ditt er, og fruktene er ikke velsmakende.
For å unngå en slik skuffelse, er det nødvendig å forstå kriteriene for å velge et godt plantemateriale. Først og fremst bør du ta hensyn til plantens alder: jo yngre de er, desto bedre. Ettåringer er mye lettere å tilpasse seg nye og ukjente forhold enn for eksempel toåringer, og derfor bør du gi dem din preferanse når du kjøper.
Du bør også ta hensyn til røttene til frøplanten du kjøper. Rotsystemet må nødvendigvis være moderat klumpete, og røttene i seg selv må under ingen omstendigheter bli skadet eller infisert. Så snart du ser et snitt eller brudd ved roten, er det bedre å kaste en slik plante umiddelbart.
Etter at du har studert roten og sørget for at den er god nok, bør du rette oppmerksomheten mot barken, grenene, stammen og kronen. Hvis de alle ser sunne og utviklede nok ut, kan du kjøpe dette plantematerialet uten å nøle og absolutt ikke være i tvil om at det ikke vil svikte deg.
Ombordstigningstid
Nå som du har en frøplante, må du finne ut når du skal plante den. Mange gartnere legger ikke så stor vekt på dette, men faktisk er riktig plantetid avhengig av hvor raskt og vellykket frøplanten kan tilpasse seg forholdene på nettstedet ditt, samt hvor forberedt den vil møte vinterkulden.
Absolutt alle profesjonelle gartnere sier enstemmig at den beste tiden å plante ikke bare pærer, men absolutt alle andre planter er våren. Barnas pære er intet unntak fra denne regelen, og derfor anbefaler vi deg å utføre alt plantearbeid om våren.
For å gjøre plantingen enda mer effektiv, bør den utføres når det ikke er fare for returfrost. For å bli overbevist om dette, bør du vente omtrent fire dager etter at været er relativt stabilt, og begynne å plante bare hvis det ikke forventes frost etter denne perioden.
Etter det vil du ha omtrent to uker på deg til å utføre prosedyren, siden når de er over, vil den aktive fasen av strømmen av juice i planten begynne, mens det er svært ønskelig å plante pæren før denne fasen begynner.
For å fremskynde prosessen og med hundre prosent sannsynlighet vil den passe inn i de gitte to ukene, anbefaler vi deg å grave hull ikke om våren, men om høsten - et kvart år før planting.Dermed kan du ikke bare ikke kaste bort tid på å grave et hull om våren, men du vil også være sikker på at alle stoffene du la til i jorden er perfekt blandet og avgjort.
Hvis du kjøpte en frøplante om sommeren, kan plantingen utføres om høsten, men du bør forstå at en slik tidsramme for denne prosedyren er forbundet med visse farer, og derfor anbefaler vi bare de mest erfarne gartnere som er helt trygge i deres evner til å utføre det, og bare hvis du har råd til å donere en frøplante i tilfelle feil. Ellers er det bedre å vente til våren.
Setevalg
Planteringsstedet er også en veldig viktig faktor som i stor grad påvirker den videre utviklingen av treet. Først og fremst er det veldig viktig å gi planten god belysning, siden pæren ikke vil vokse normalt uten den.
Det er også strengt forbudt å plante en pære i enhver depresjon, som et naturlig lavland. Faktum er at under nedbøren, og spesielt under snøsmelting, er det i slike lavlandet at alt vannet vil samle seg, noe som vil føre til overdreven fuktighet av planten og som et resultat av et mulig utseende av et slikt ubehagelig sykdom som rotrot.
For å unngå en lignende skjebne for planten din, bør du også kontrollere plantestedet for tilstedeværelse av grunnvann. De bør være plassert på en dybde på mer enn to meter, ellers skjer det samme scenariet som beskrevet i forrige avsnitt, men denne gangen - mye raskere og raskere.
Du bør også sørge for at veksten av planterøtter ikke blir forstyrret av gjerder eller vegger i bygninger, og derfor bør det holdes en avstand mellom dem og plantingsstedet. Det samme gjelder for å finne to planter i forhold til hverandre, siden de blir plantet på for liten avstand, og vil stadig konkurrere om næringsstoffer og forstyrre hverandre med kronene sine, noe som naturligvis ikke kommer til noe bra.
Pære klasse Barne: plantingsprosedyre
Først av alt, hvis du ikke har gravd et hull ennå, må du begynne med det. Dybden på plantingsutsparingen bør være omtrent en halv meter - sytti centimeter (avhengig av størrelsen på rhizomet til pæren din). I diameter bør denne depresjonen nå omtrent en meter.
Det er også veldig viktig å gi planten alle næringsstoffer og mineraler som vil mate den i løpet av de første to til tre årene med rhizomvekst. Det er disse første årene som er de viktigste i dannelsen og utviklingen av rotsystemet, og derfor bør høsten vurderes nøye som befruktning.
Til å begynne med må du finne god, fruktbar jord, som du sikkert har i besittelse. Deretter legger vi til en bøtte med humus, som ikke bare vil gi næring til planten, men også kan gi ekstra beskyttelse under vinterkulden.
Vel, for å akselerere veksten og utviklingen av planten, bør du legge til omtrent to hundre gram superfosfat og femti gram nitrat til den resulterende jordblandingen. Det er også tilrådelig å tilsette omtrent hundre gram kaliumsulfid. Alle disse ingrediensene vil fungere sammen for å skape et sunt, sterkt og grovt rotsystem.
Viktig!
Mange tror at humus og gjødsel er organisk ekvivalent gjødsel, og derfor er de utskiftbare. Dette er imidlertid absolutt ikke sant, og bruk av møkk i stedet for humus i oppskriften ovenfor kan være en dødelig feil som vil ødelegge treet ditt. De uforberedte, unge røttene vil ganske enkelt brenne ut, og treet dør snart.
Nå som hullet er gravd og fylt med alle nødvendige næringsstoffer, er det nødvendig å lage et lite jordskred i bunnen av det samme hullet, som vil bestå av jordblandingen vi har forberedt.Dette lysbildet skal ikke være for stort, men høyt nok til at alle plantens røtter kan plasseres på det.
Nå er rotsystemet til plantematerialet pent fordelt over overflaten på denne bakken på en slik måte at røttene ikke blir sammenflettet og ikke forstyrrer hverandre, og også slik at de blir rettet i forskjellige retninger. Denne tilsynelatende enkle prosedyren vil sikre stabiliteten til ditt fremtidige tre.
Det gjenstår bare å fylle alle de gjenværende hulrommene med jord. Samtidig er det veldig viktig å komprimere jorda du fyller. Likevel må dette gjøres uten unødig fanatisme, siden ved å komprimere jorden for mye, kan du godt skade røttene.
På den annen side, hvis det ikke er nok å komprimere jordblandingen, eller ikke i det hele tatt, øker du risikoen for at det dannes luftbobler i gropen, hvis utseende kan forårsake rotrot.
Når du fyller hullet med jordblanding, bør du også passe på å vanne hullet, siden spiren trenger et veldig kraftig innledende trykk, noe som vil hjelpe den med å tilpasse seg til vekst i åpen mark, og også gi den nok næringsstoffer til å umiddelbart gå inn i vokser.
I tillegg er vann også gunstig fordi det vil komprimere jorden ytterligere og forhindre at det dannes luftbobler.
Likevel, når du vanner, trenger du ikke å være for fanatisk, siden for mye fuktighet kan føre til stagnasjon av vann ved røttene og for tidlig forfall. Så hvis du overdriver det med mengden vanning, kan du bare nærme problemet du prøvde å beskytte planten mot.
Forresten, bør følgende punkt nevnes: frøplanten du velger, til tross for at den har et ideelt rotsystem, stamme og krone, kan ha noen feil, for eksempel en vridd stamme. De er ikke kritiske, og treet kan godt leve med dem, men det vil også trenge spesielle forhold som vil hjelpe det med å tilpasse seg tilværelsen med en slik defekt.
Derfor, hvis stammen til planten din er bøyd, bør du plante den på en slik måte at den er rettet mot sør, og følgelig når frøplanten når lyset, vil den rette seg.
Selv dette er imidlertid ikke slutten på landingsprosedyren. Faktum er at plantene først vil sitte ekstremt ustabile i hullene, og derfor trenger de hjelp. Slik støtte kan gis av en vanlig strømpebånd til en pinne som er tett drevet ned i bakken. I tillegg vil denne støtten la planten vokse ekstremt jevnt.
Vi anbefaler deg på det sterkeste å kappe umiddelbart etter planting. Vi har allerede snakket om nytten av denne prosedyren mer enn en gang i artiklene våre, og vi vil gjenta den igjen. Mulch forhindrer ikke bare at fuktighet fordamper for tidlig fra jordoverflaten på spesielt varme dager, det beskytter også planten mot invasjon av snegler og snegler, og forhindrer også at ugress mottar solenergi og forhindrer dem i å vokse normalt.
Kronedannelse
Som du allerede vet, er babypæretreet ganske høyt, og derfor, jo større og høyere det blir, jo mer tilfeldig vil kronen vokse. Din oppgave som gartner er å unngå dette, siden en uregelmessig formet krone er beheftet med noen ubehagelige konsekvenser.
Først av alt bør det bemerkes at jo flere frukter som dannes på treet, jo mer vil smaken falle og følgelig størrelsen. I tillegg vil det enorme antallet grener som skjuler hverandre forstyrre det normale forløpet av fotosynteseprosessen.
Det er derfor det er ønskelig å opprettholde formen på kronpyramidalen. Du bør også være forsiktig med å sikre at grenene vokser i riktig vinkel (omtrent nitti grader eller vinkelrett på stammen).Dette må gjøres fra plantingsøyeblikket, siden når grenene vokser og blir sterkere, vil det være ekstremt vanskelig å korrigere formen.
Først og fremst bør du ta vare på nettopp de grenene som vokser i feil vinkel. I tilfelle du ser grener vokse i for skarp vinkel i forhold til stammen, bør de korrigeres med spesielle avstandsstykker.
Hvis det observeres at grener vokser i en stump vinkel, brukes metoden for å knytte grenen til stammen med hyssing eller vanlig hagetau. Det er også lurt å plassere et gummifôr på grenen for å forhindre at tauet skader barken.
Etter en tid med en slik innvirkning på grenen, vil den rette seg opp og begynne å vokse i riktig vinkel. Etter hvert som treet utvikler seg, vil disse grenene bli sterke og stabile, og derfor vil de ikke lenger kunne bøye seg til sin tidligere feilaktige tilstand.
Når det gjelder beskjæring, som er en av de viktigste prosedyrene i hagebruk, er det helt uønsket å bruke det på unge trær, siden det i en så tidlig alder ikke kan ha en positiv effekt på plantens helse. Noen ganger er imidlertid denne prosedyren ganske enkelt nødvendig. Spesielt hvis grenene har noen skader eller hvis de er veldig lange.
For at omskjæringen skal kunne utføres trygt og uten ubehagelige konsekvenser for treet, bør du sørge for at du bruker ekstremt skarpe instrumenter av høy kvalitet som ikke etterlater unødvendige arr på grenene som ikke bidrar til helbredelse i det hele tatt.
Det er også tilrådelig å smøre det avskårne stedet med knust kull eller hageplass, noe som forhindrer at infeksjon kommer inn i planten.
For at kronen skal danne seg riktig, må du ikke ha mer enn fem til seks bærende (også kalt skjelett) grener. Det er de som vil være ansvarlig for dannelsen av kronen, og det er på dem at nitti prosent av fruktene vil bli dannet, og derfor er det deres gode tilstand som er din primære oppgave.
Utviklingen av sterke og pålitelige skudd er også veldig viktig for dannelsen av fruktbare og effektive grener, og derfor må de også kontrolleres. Hvis vi snakker om skjelettgrener, så er dannelsen av skudd på dem i en spiss vinkel helt uakseptabel, siden de kanskje ikke er sterke nok, noe som til slutt, når fruktene dannes, vil føre til at skuddene vil bare bryte av.
Selve prosedyren for beskjæring og dannelse av skudd og grener utføres utelukkende om våren, siden det er på denne tiden av året at planten er minst utsatt for noen ytre påvirkning og har den sterkeste immuniteten for å kunne overleve vellykket en slik traumatisk prosedyre.
Det er også veldig viktig å gjøre vinkelen til absolutt hvert snitt omtrent førtifem grader. Dermed vil du sikre treet en rask helbredelse av kuttstedet og fullstendig umulighet for penetrasjon av virus og bakterier inne.
Kronen, som rotsystemet, tar fra fire til fem år, og derfor, når treet allerede er dannet, vil behovet for konstant beskjæring ganske enkelt forsvinne, siden alle skudd og grener vil vokse riktig.
Trimming kan imidlertid ikke kastes helt. Den eneste forskjellen er at den vil tjene rent forebyggende formål. For å være mer presis, vil det være nødvendig for å fjerne skadede og syke grener.
Pæreklasse for barn: beskyttelse mot kaldt vær
Som allerede nevnt er denne pæresorten ekstremt motstandsdyktig mot kaldt vær, som er en av hovedfaktorene i populariteten i landet vårt. Spesielt hvis vi snakker om et modent og modent tre, trenger det ikke noe ly i det hele tatt.
Unge trær, spesielt i svært alvorlige frost, kan imidlertid bli betydelig skadet. Dette gjelder spesielt rotsystemet, som på dette utviklingsstadiet fortsatt er veldig sårbart og svakt.
Derfor er det nødvendig å gi vinterbeskyttelse først og fremst til unge frøplanter, og dette bør gjøres i området rundt rotkragen og rotdelen av stammen.
Den beste måten å beskytte disse delene mot forfrysninger ville være ekstremt voluminøs mulching, samt innpakning med en hageklut, som ikke vil la kulden skade plantens delikate vev.
Omsorg etter landing
Nå som du har fullført plantingsprosedyren og den første beskjæringen som danner kronen, kan vi si at alle vanskelighetene knyttet til omsorg for denne planten ligger bak. Ganske enkle prosedyrer venter på deg, den viktigste regelen i implementeringen er periodisitet og konsistens, og derfor bør du ikke ha noen problemer.
Vanning, fôring
Selvfølgelig, når vi snakker om konstant, rutinemessig pleie av en plante, kommer vanning først og fremst i tankene. Faktisk bør det bemerkes at denne planten ikke trenger å vannes veldig ofte. I gjennomsnitt utføres denne prosedyren bare når bakken rundt tørker opp, noe som, gitt effekten av mulch, ikke skjer ofte.
Hvis jorda rundt treet er ganske fuktig, så er det på ingen måte verdt å begynne å vanne, uansett tidsramme, siden overdreven vannlogging, som du allerede vet, kan bli store problemer for planten.
Enkelt sagt, du bør alltid prøve å holde deg i den gylne middelveien, når planten ikke vil bli for vannet, men ikke vil dø av tørst samtidig. Det er derfor å opprettholde balansen er det viktigste når du vanner.
Selvfølgelig vil absolutt hver gartner at planten hans skal være så fruktbar og effektiv som mulig, og derfor, hvis du vil ha det samme, som vi ikke engang tror å tvile på, må du tenke på hvordan du kan gi planten det beste gjødsel ....
I tillegg hjelper mineraler som nitrogen planten ikke bare til å vokse og utvikle seg raskere, men også begynne å bære frukt tidligere, noe som uten tvil er et stort pluss for selgere som ønsker å markedsføre sine produkter så snart som mulig.
For at nitrogengjødsel skal ha den mest gunstige effekten på planten, bør den administreres i henhold til følgende instruksjoner:
Omtrent femti gram ammoniumnitrat spres jevnt rundt stammen, hvoretter jorden blir gravd opp slik at gjødsel kan blande seg med jorda og bosette seg i den.
Du må imidlertid være ekstremt forsiktig når du bruker en spade, ettersom rotsystemet til nesten hvilken som helst pære sprer seg veldig nær overflaten, og derfor kan du ved et uhell og utilsiktet skade den.
I tillegg til å mate pærer med nitrat, anbefaler vi at du bruker natriumhumat. Dette gjøres bare tre ganger i året: første gang - når knoppene begynner å blomstre, andre gang - i juli, når de første fruktene begynner å dukke opp, og den siste gangen - i slutten av august, da samlingen av frukt tar slutt.
Denne periodisiteten vil gjøre det mulig for anlegget å fordele ressursene mest effektivt, overleve vinteren vellykket og bli energisert i begynnelsen av neste sesong.
Pære klasse barn: sykdommer
Absolutt alle pærer tilhører de plantene som lider ganske mye av sykdommer på grunn av deres kraftige immunsystem og sterke ytre beskyttelse. Babypæren er spesielt godt beskyttet mot soppinfeksjoner, som ofte forårsaker svært alvorlige problemer og forstyrrer gartnere sterkt.
Likevel er det virkelige problemet for denne pæren alle slags skadedyr som ikke bare skader barken og bladene, men også kan komme til innsiden.
For å bli kvitt de fleste parasitter som elsker å feste på pæren, er det et stort antall insektdrepende preparater på markedet som har en dødelig effekt på både pæremøll og flått.
For å gjøre en sikker sprøyting som ikke vil skade dine andre planter og dyr, bør du velge en usedvanlig rolig dag for det. Faktum er at insektmidler er ekstremt giftige og skadelige legemidler som ikke utgjør noen trussel mot pærer, men kan bli et problem for for eksempel prydplanter.
Sprøyting anbefales også om våren. For det første er det på dette tidspunktet at de fleste insektene blir mest aktive, og for det andre vil planten på dette tidspunktet være klar for eksponering for kjemikalier.
Etter to eller tre bør gjentatt forebyggende sprøyting utføres, takket være at planten din vil bli beskyttet for hele neste sesong.
Forebyggende sprøyting er veldig viktig, ettersom du ikke engang kan forestille deg når akkurat et slikt angrep, som møll eller flått, vil angripe deg. Vel, for at du ikke trenger å håndtere konsekvensene av handlingene deres, er det mye bedre å ikke la dem vises i det hele tatt.
I tilfelle du savner utseendet av parasitter eller insekter på treet ditt, vil det snart begynne å verke og visne. Som et resultat, hvis ingenting blir gjort, er til og med plantens død ganske mulig.
Derfor, så snart du merker smertefulle formasjoner på blader, grener eller skudd, bør du umiddelbart finne årsaken til forekomsten og behandle planten med et stoff som vil bidra til å bekjempe infeksjonen.
For å sikre treets sikkerhet i neste sesong bør absolutt alt løvet som har falt fra pæren brennes om høsten. Dette gjelder spesielt de plantene som insektene gjorde sine forsøk på, siden det er fullt mulig at de vil gjemme seg blant bladene for vinteren og våkne om våren og angripe pæren igjen.
Ikke glem en annen faktor som utgjør en fare for pærer: om gnagere. Disse små skadedyrene kan skade barken på et tre alvorlig, og noen bakterier eller virus kan trenge gjennom hullene i plantens beskyttelse.
Derfor, spesielt de første fire til fem årene av en plantes liv, bør du pakke stammen inn med et slags beskyttende lag, for eksempel tjærepapir. Husk imidlertid at den ikke skal berøre barken direkte, og derfor bør du pakke kofferten med avis før du prikker den.
Skadedyr
Vi har nevnt langt fra den største delen av alle skadedyr som kan angripe treet ditt, og derfor vil vi nedenfor fortelle deg om nesten alle krypende og flygende ulykker som kan skade pæren din.
Fruktmidd
Dette er et ekstremt vanlig insekt som mest sannsynlig lever i hagen din. Det er skadelig ved å suge næringsstoffer fra bladene, noe som bremser fotosyntesen og gjør treet tregt og svakt.
Dette påvirker selvfølgelig også fruktene, som vokser mye mindre og saftige. Derfor ble flåtten kalt frukt, selv om den spiser blader.
For å takle det, anbefales det å bruke et insektmiddel under veksten av knoppene. Det er på dette tidspunktet at insektet oftest angriper, og derfor vil du ha en sjanse til å beskytte planten.
Pæremøl
Dette insektet er en liten sommerfugl, som likevel kan forårsake veldig store problemer. For å være mer presis, er problemene forårsaket av larvene, som klekkes fra små egg som legges direkte i frukten.
Problemet er at det er Pear, Children's sort, som er det ideelle miljøet for vekst og reproduksjon av denne sommerfuglen, siden den for det første er en sommersort og modningen faller akkurat på toppen av aktiviteten til disse parasittene, og for det andre har denne sorten en ekstremt tynn hud som et insekt lett kan snike seg gjennom.
Som et resultat har insektets handlinger en ekstremt kritisk effekt på planten. Produktiviteten synker raskt, og de fruktene som ikke faller for tidlig, vil sannsynligvis også bli infisert med små larver.
Derfor må du bekjempe insektet umiddelbart.For dette brukes forskjellige insektmidler, og hvis planten har blitt angrepet av insekter, må alle blader og falne, ubrukelige frukter ødelegges.
Vintermøl
Dette insektet er også farlig på grunn av eggleggingene, hvorfra små larver senere klekkes og spiser pæren. Imidlertid legger møllen dem, i motsetning til møllen, i barken på grener, noe som resulterer i at fruktbarheten synker kraftig.
I tillegg begynner klekkende larver å spise veldig aggressivt absolutt alt uten forskjell: blader, frukt og til og med knopper - alt faller under deres slag. Metodene for å håndtere møllen er absolutt de samme som med møllen.
Pære kobber
Dette insektet er en liten flue som også angriper treet med sine larver. I voksen alder begynner de å mate på juice fra bladene og stammene på treet, som en følge av at en stor del av avlingen dør allerede før fruktene begynner å modnes.
Blomstene dør av og vokser derfor aldri til en frukt. Det er derfor forresten så vanskelig å legge merke til effekten av dette insektet, fordi det praktisk talt ikke etterlater spor.
Imidlertid kan forebyggende sprøyting enkelt fjerne den fra pæren din. Hvis du merker unormal blomstring, kan du bruke insektmiddelbehandling.
Konklusjon
Barnas pære er absolutt en fantastisk variant, som ikke bare er egnet for salg, men også for utvikling av din egen hage, hvis frukt brukes til å lage kompott eller til å lage deilige potetmos.
Selvfølgelig, som alle varianter, er denne pæren ikke uten ulemper. Likevel oppveier det enorme antallet fordeler det har klart ulempene og gjør det til en av de beste variantene for vår region.
Vi håper denne artikkelen hjalp deg med å bestemme om du trenger denne planten eller ikke, og hvis du fortsatt vil ha en pære, vil du ikke ha noen problemer med å vokse og ta vare på den. Alt vi trenger å gjøre er å ønske deg lykke til.
Pæreklasse for barn