Hvordan forplante hortensia.
Innhold:
Den frodige blomstrende hortensiaen, som er vakker ved blomsterstandenes skjønnhet, på grunn av at noen ganger til og med buskens grøntområder ikke er synlig, vil få mennesker være likegyldige, og gartnerne vil ganske enkelt miste roen til denne skjønnheten er på stedet deres . Ved første øyekast, selv for erfarne gartnere som ikke har erfaring med å dyrke hortensiaer, synes reproduksjonen av denne busken å være ganske vanskelig. Faktisk krever denne prosessen ingen spesielle ferdigheter. Du trenger bare å kjenne noen regler, samt følge enkle anbefalinger, og selv en ikke altfor erfaren gartner kan uavhengig dyrke den nødvendige mengden plantemateriale. Så i denne artikkelen vil vi fortelle deg hvordan du forplanter en hortensia riktig.
Hvilke alternativer kan du forplante hortensia.
Det skal bemerkes at det ikke er vanskelig å skaffe hortensia plantemateriale på egen hånd, og det er mer enn ett alternativ for å forplante en busk, inkludert: frø, lagdeling, skudd, stiklinger, deling av busken.
Det bør bemerkes at de listede alternativene har både fordeler og ulemper.
For eksempel er det ikke alltid mulig å kjøpe hortensia av ønsket sort, og mange bestiller frøene til planten de liker. I dette tilfellet må du være forberedt på at prosessen med å dyrke frøplanter vil kreve mer innsats og tid, og resultatet vil ikke oppfylle forventningene. Det er faktisk ikke uvanlig at bare halvparten av frøene kan spire, og den resterende halvdelen vil som et resultat ikke fullt ut ha alle kvaliteter og egenskaper til moderplanten. Dette er forresten en ganske vanlig ulempe ved denne avlsmetoden. Av denne grunn blir busken oftere forplantet av stiklinger, lagdeling og også ved å dele busken. Siden mange noterer seg brukervennligheten og effektiviteten til de tre listede metodene, vil vi analysere hver av dem mer detaljert.
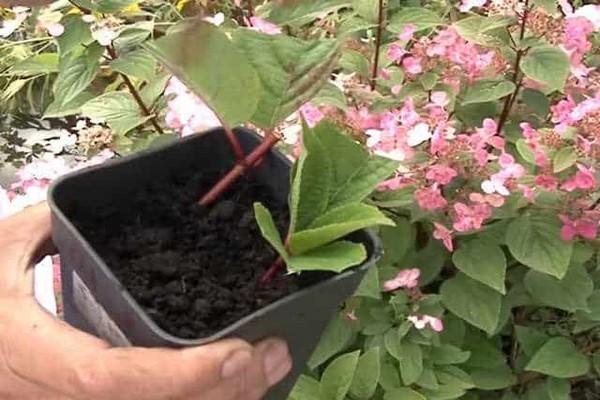
En busk fra en skjæring.
Skjæring er kanskje en av de enkleste måtene å forplante hortensiaer. Så med sin hjelp, fra en liten plante, men med stor omsorg og oppmerksomhet fra din side, kan du vokse en fullverdig busk med nydelige blomsterstander, som vil bli et landemerke i hagen din, hvoretter du ikke lenger kan kalles en uerfaren gartner.
Når du begynner å reprodusere hortensiaer, trenger du bare å ta hensyn til noen av nyansene.
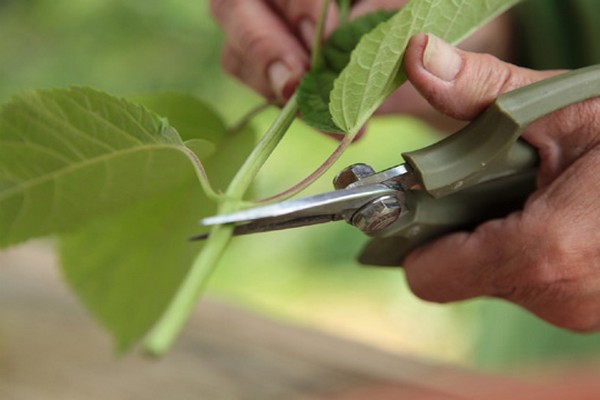
Stiklinger bør kuttes fra antall friske skudd, uten tegn på sykdom, skadedyr eller mekanisk skade. Det anbefales også at stiklinger lages av unge, ennå ikke lignifiserte nedre skudd som vender mot solsiden. I tillegg bør du ikke kutte stiklinger fra skudd av unge busker som ennå ikke er ett år gamle. Roting av slike stiklinger er usannsynlig. Dessuten har busken selv ikke modnet ennå, rotsystemet er ikke utviklet nok til å gjenopprette skuddene som vil bli kuttet av. Som et resultat kan du ødelegge planten fullstendig.
Det skal bemerkes at hortensia kan skjæres gjennom hele sesongen, fra den første sommermåneden til oktober. Derfor, hvis det første forsøket i juni ikke var særlig vellykket, med tanke på mulige feil, kan du øve på å kutte hortensia til høsten.
Om sommeren plantes avskjærede stiklinger vanligvis direkte i bakken, og om høsten i spesialforberedte beholdere, som deretter plasseres i et rom hvor stiklingene slår rot og vokser til våren. I sistnevnte tilfelle vil det selvfølgelig kreves mer forsiktighet og oppmerksomhet, det vil være nødvendig å opprettholde en viss lufttemperatur og forhindre at jorden tørker ut.
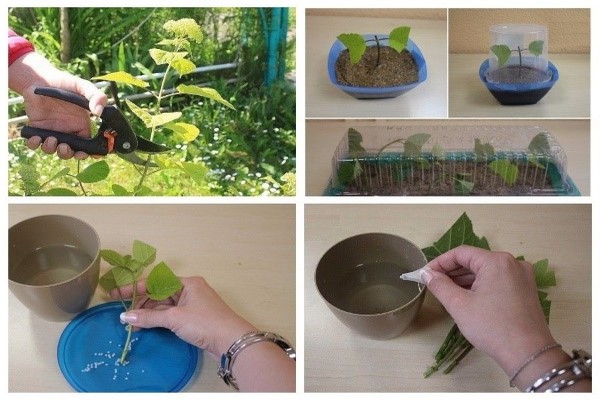
For kutting av skudd og kutting av stiklinger, bør bare godt skjerpet verktøy brukes.
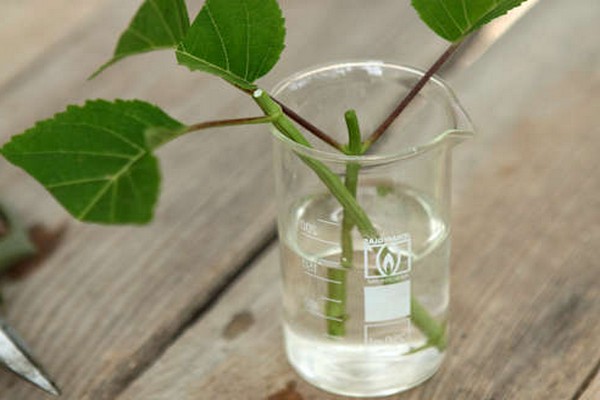
Eksperter anbefaler å kutte grener for stiklinger om morgenen eller på en overskyet dag, da mister de mindre fuktighet, noe som er viktig for forankring og fremtidig vekst. Videre må grenene, umiddelbart etter at de er kuttet, legges i vann, ikke minst etterlate dem uten fuktighet.
Etter beskjæring skal hver av stiklingene ha tre, minst to par blader. I det laveste paret blir bladene helt avskåret, i det andre og tredje blir de forkortet med minst halvparten. Både de øvre og nedre kuttene av stiklingene er laget på skrå. Avstanden fra begynnelsen av kuttet til internodene som bladene vokser fra skal være minst 1 cm.
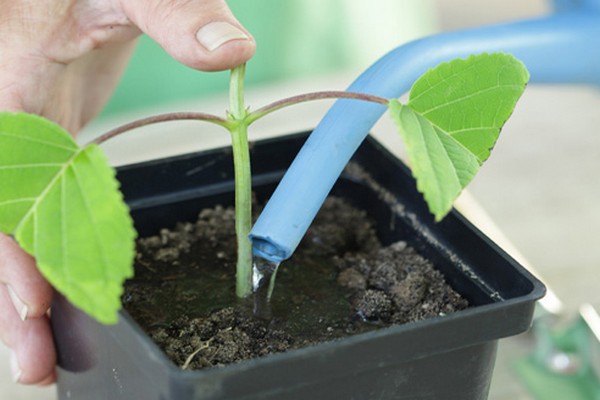
Før du planter hortensiaen i bakken, må stiklingene stå i løsningen i tre timer og plassere dem slik at skuddbladene er over vannoverflaten. Denne løsningen består av vann med tilsetning av noen få dråper av et vekstfremmende stoff. Beholderen med stiklinger plassert i løsningen blir igjen i mørket. Forresten, i fravær av vekststimulerende midler kan du ganske enkelt legge til en liten skje honning i et glass vann. Som erfarne gartnere bemerker, vil røttene vises enda raskere i dette tilfellet.
Når du planter stiklinger, må du huske at et solfylt sted ikke er egnet for dem, siden bladene på plantene kan brenne. Jorda som er optimal for dyrking av stiklinger av hortensia består av sand og torv, i forholdet en til to. Disse komponentene må blandes godt. I fravær av disse ingrediensene, bruk en kommersielt tilgjengelig jord designet for dyrking av azaleaer, ideelt balansert i sammensetning og for unge planter. hortensia.
Det er nødvendig å smelte voks, parafin på forhånd, eller du kan bare lage strålende grønt. Før du planter, på noen av de angitte måtene, vil det være nødvendig å senke det øvre snittet av stiklingene.
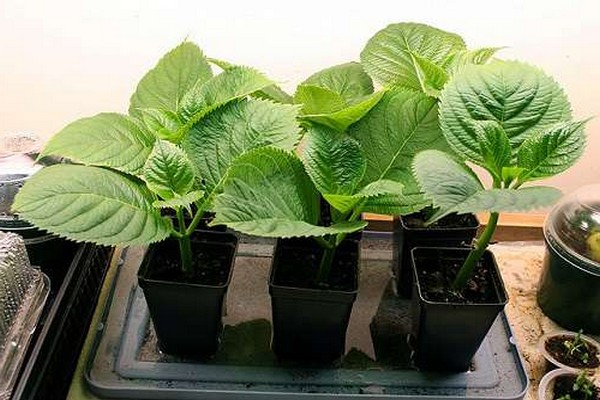
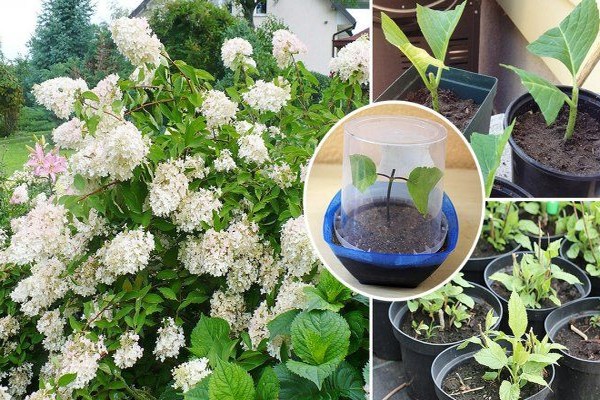
Plantejorden er lett fuktet og stiklinger plantes. Dybden på plantingen er ikke mer enn 3 cm, og bladene bør ikke berøre bakken. På toppen av jorda skal et sandlag med en tykkelse på minst 2,5 cm helles. Videre for at stiklingene lettere skal slå rot, må de dekkes. Du kan bruke kutte plastflasker, glassbøtter og til og med enkle plastposer til dette. Ved bruk av poser må de imidlertid fjernes annenhver dag, og plantene skal ventileres. Ved å dekke til stiklingene kan de vannes sjeldnere i løpet av uken, bare et par ganger er nok. La plantene stå åpne, i tillegg til å øke antall vanninger, vil det være nødvendig å spraye dem i tillegg, opptil to ganger om dagen.
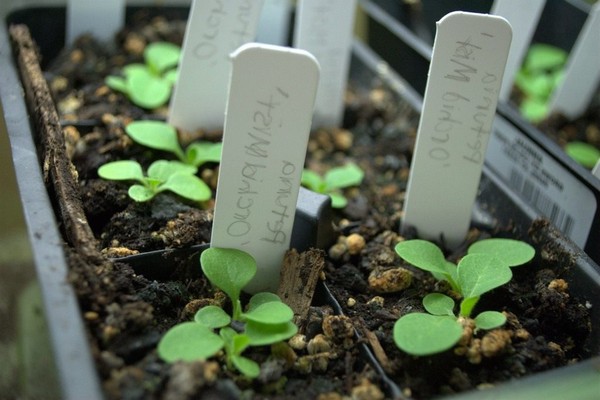
Vanligvis tar rooting av stiklinger minst en måned, uavhengig av om de er plantet i åpen mark eller i en beholder. Hvis du gjorde alt riktig, slo stiklingene rot og rotte seg, så begynner knoppene å svelle etter denne tiden, og snart vil nye blader klekkes. Du bør ikke skynde deg å fjerne tilfluktsromene, dette bør gjøres ikke tidligere enn det øyeblikket du merker at stiklingene har begynt å vokse.
Videre er det viktig å gi plantene konstant omsorg, overvåke lufttemperaturen og jordfuktigheten. Husk at du må vanne og spray plantene minst 2 ganger i uken. På dette stadiet er plantene veldig svake og reagerer på tilsynelatende mindre endringer. For eksempel kan temperatursvingninger på 5-7 grader allerede føre til at de dør.
Om våren, et par uker før hortensiaene plantes, begynner de å stivne. Beholdere med planter i flere timer om dagen blir først igjen på en lukket veranda. Etter hvert som plantene tilpasser seg en gitt temperatur, fortsetter de å bli herdet og tatt ut på gaten, fra en time om dagen, og gradvis øke denne gangen.
Så snart positive temperaturer er etablert, plantes plantene på et valgt sted eller i separate senger for senere dyrking.
Del hortensiabusken.
La oss gjøre en reservasjon med en gang at delingen av busken er uakseptabel for bare en type hortensia - panicle. Muligheten for å bruke denne metoden er også begrenset til en viss periode - midten av september. Delenki plantet på et senere tidspunkt, mest sannsynlig, vil ikke ha tid til å vokse røtter, samt lager mat og næringsstoffer som er nødvendige for å overleve vinteren.
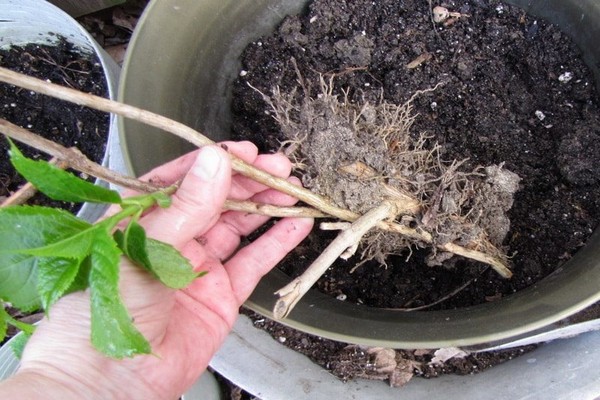
Å dele busken vil kreve omsorg og nøyaktighet. Til å begynne med graver de litt i busken, for så sakte, helt å grave det ut med en høygaffel, og prøver å skade røttene så lite som mulig. Den utgravde busken er delt på en slik måte at minst 2 knopper med fornyelse forblir på hver av divisjonene, det vil si knopper, hvorfra skudd vil utvikle seg i fremtiden.
Plantehull må forberedes på forhånd. I tillegg må kompleks mineralgjødsel tilsettes til jordblandingen som hullene helles med, noe som bidrar til tilpasning av planter etter divisjon og transplantasjon. Videre bør buskene vannes rikelig. For at plantene skal slå rot raskere og bygge opp rotsystemet, vannes det annenhver dag. Men hvis høsten er regnfull, er det ikke behov for vanning.
Det er mulig å få et kutt uten å grave opp en hortensia. For å gjøre dette graves busken inn og frigjør noen av røttene fra bakken. Videre blir skuddene, sammen med røttene, skilt fra busken ved hjelp av et godt skjerpet og rent verktøy. Det resulterende kuttet, uten å nøle, plantes i et hull som er forberedt på forhånd. Denne delingsmetoden er selvfølgelig mindre smertefull for busken. I tillegg er denne metoden egnet for de som ønsker å forynge allerede modne busker.
Å få stiklinger av planten.
Det er tilrådelig å starte reproduksjonen av en busk ved lagdeling etter blomstringens slutt. Denne metoden vil kanskje nesten ikke kreve noen innsats, mens du på våren vil ha den nødvendige mengden plantemateriale.
Til å begynne med må jorda i stammesirkelen graves opp med ca 15 cm. I dette tilfellet trenger du ikke være nidkjær, siden du lett kan skade røttene. Videre er bakken planert, og vinkelrett på busken lages små spor, bare et par centimeter dype. Et skudd legges i hvert spor og festes med metallpinner, for eksempel laget av wire. Prøv å legge skuddet slik at toppen av skuddet holder seg over jorden og er vertikal. Lagene må drysses litt med jord, slik at spirene som begynner å dukke opp etter 2-3 uker kan bryte gjennom jordlaget. Når spirene når 8-10 cm i høyden, må de også kuttes. Det er viktig å huske at det beste resultatet vil bli gitt av ennå ikke lignifiserte skudd.
Når du vanner hortensiaen din, må du ikke glemme å vanne kuttene. Du kan dele lagene ikke tidligere enn våren eller neste høst.
Det skal bemerkes at denne avlsmetoden fremdeles ikke er veldig vanlig. Busken, som pleies regelmessig, har ikke mange skudd, siden den gjennomgår regelmessig sanitær beskjæring, så vel som formativ beskjæring. På grunn av sin effektivitet og enkle utførelse er den imidlertid ganske egnet for avl av busker.
Konklusjon
Dermed vil metodene ovenfor for avl av en busk ikke forårsake problemer selv for en nybegynner gartner. Det viktigste å huske er at hortensia er en veldig fuktighetselskende plante, og derfor er regelmessig vanning nøkkelen til riktig og rettidig utvikling av busken. Belønningen for det møysommelige arbeidet vil være frodige blomstrende knopper, gledelige for øyet og dekorere hagen.