Stikkelsbærmalakitt: beskrivelse, dyrking
Innhold:
Artikkelen presenterer stikkelsbær -malakitt: beskrivelse av sorten, dyrkingsregler, omsorg, beskyttelse.
For mange gartnere ligner stikkelsbær kirsebærplommer og druer i form og farge. Av denne grunn kalles stikkelsbær også den nordlige druen, russisk kirsebærplomme. Stikkelsbærens nærmeste slektning er imidlertid ripsen. Stikkelsbær er en ganske vanlig avling; den finnes nesten overalt. Unntakene er Sør -Amerika, Australia og Afrika. I vårt land er denne kulturen ganske etterspurt, gartnere elsker stikkelsbær for sine søte bær, så vel som for universell bruk av frukt.
Stikkelsbærmalakitt: variasjonsbeskrivelse og egenskaper
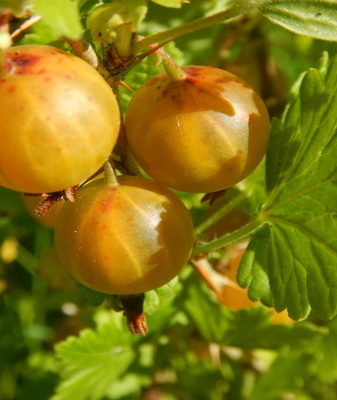
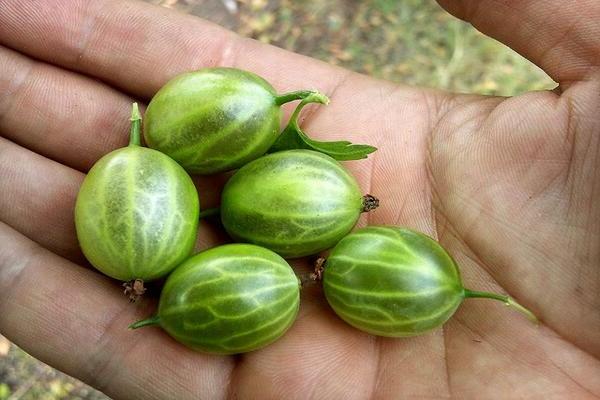
Stikkelsbær Malakitt: foto
Stikkelsbærsorten Malachite ble oppdrettet av oppdrettere relativt nylig. Stikkelsbær er en kultur spredt over hele verden, inkludert i vårt land. Stikkelsbær kom til Russland på midten av 1500 -tallet, og denne planten ble kalt "kryzh" eller "bersen". I naturen har stikkelsbærbusken et stort antall bær som er for små og ikke søte, samt mange torner. Vill stikkelsbærbusker har ikke høyt utbytte.
Stikkelsbærmalakitt ble avlet i 1959 ved å krysse varianter som f.eks Svart negus og dato.
Denne stikkelsbærsorten kan sammenlignes positivt med andre varianter. Malakitt bærer ganske store frukter, har et høyt produktivitetsnivå og har også en vakker bærfarge, takket være at sorten har fått sitt navn. I sin høyde når busken som regel en og en halv meter, toppen av busken har en spredende form. På samme tid vokser busken ganske kompakt i en del av jordstenglene. Unge stilker, malt i en delikat grønnaktig fargetone, har en litt pubescent tekstur. I det andre året er det torner på stilkene, som ligger ganske sjelden langs hele skuddets lengde.
I sin masse når en frukt som regel 5 - 6 g. Bærene er farget i en lys grønnaktig fargetone. Når frukten modnes helt, blir den med en gul farge, fruktene har en tynn skall. Årene inne i frukten er godt synlige, fruktkjøttet inneholder mange små frø.
Når det gjelder smaksprøver av denne sorten, gir gartnere 3,9 av 5 poeng. Etter strukturen er bærene ganske tette, har en lys stikkelsbæraroma, har en høy grad av transportbarhet, og fruktene kan lagres i lang tid.
I henhold til formålet er denne stikkelsbærsorten universell. Det er perfekt for å lage søte retter, forskjellige tilberedninger, og også bærene er fantastiske ferske.
Når det gjelder modningstid, tilhører denne stikkelsbær-sorten mid-tidlige varianter. Malakitt bærer frukt ganske lenge. Dette er en ganske produktiv stikkelsbærsort, fra en plante kan du få omtrent 4 kg bær. Som regel begynner stikkelsbær å bære frukt med full kapasitet når planten blir 3 år gammel. I dette tilfellet dannes eggstokkene på toårige stilker. Denne stikkelsbærsorten har en ganske sterk immunitet, angripes praktisk talt ikke av mugg. Malakitt tåler lave temperaturer ganske godt, tåler frost ned til minus 30 grader.
Denne stikkelsbærsorten føles flott i midtbanen. Dette stikkelsbær tåler ikke for tørre og varme værforhold heller dårlig.Selv om malakitt betraktes som en hybrid, oppnådde denne planten etter 60 år egenskapene til en sort, og nå regnes den med rette som en egen stikkelsbær -variant.
Stikkelsbærmalakitt: planting og viktige regler
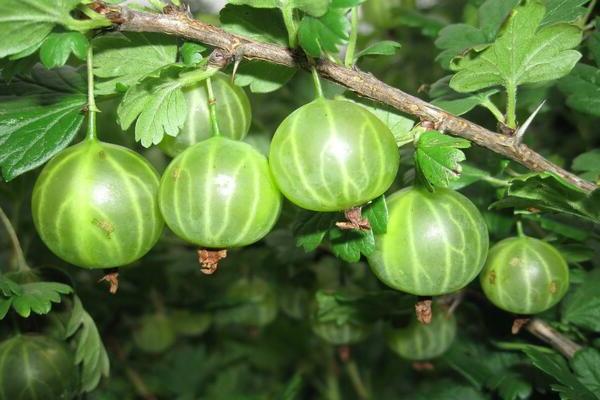
Bilde av stikkelsbær -malakitt
Dette stikkelsbær begynner som regel å bære frukt i det andre året av livet, og produserer bærene i 15 år. Selve toppen av frukten faller på perioden fra 3 til 5 års planteliv, hvoretter avlingsnivået blir lavere. Men hvis du følger de grunnleggende reglene for landbruksteknologi av denne sorten, kan fruktingen vare lenger. Når du velger et sted for å plante denne stikkelsbærsorten, er det bedre å foretrekke velopplyste områder der grunnvannet ikke er for høyt. Stikkelsbær vil vise gode avlinger på godt befruktede landområder, jorda skal ha en ganske lett struktur. Det er nødvendig å påføre ekstra gjødsel på jorden nøye.
La oss snakke om hvordan du skal plante denne stikkelsbærsorten riktig. Det er best å kjøpe plantemateriale fra spesialiserte barnehager eller hagebutikker. Rotsonen til busken skal dypes ned i bakken med 5-6 cm. Så plantene vil raskt kunne danne erstatningsrøtter, stikkelsbæret tåler bedre transplantasjonsprosessen. For å plante en plante er det bedre å velge høsttid eller begynnelsen av våren, når saftstrømmen ennå ikke har begynt. Unge stikkelsbærplanter bør ha 3 til 5 skudd.
Hvis du finner deformerte røtter før du planter en busk, behandler du dem med en desinfeksjonsløsning, og behandler dem også med aske. I dette tilfellet må stilkene forkortes og etterlate bakken med 10-15 cm. Den ideelle lengden på skuddene er lengden på plantens viktigste rhizom. Hvis arealet for å plante stikkelsbær er for lite, kan plantene komprimeres litt. Men plantingen bør ikke bli for tykkere, siden det vil være vanskelig å ta vare på slike planter. I tillegg påvirker plasseringen av planter for nær hverandre negativt kvaliteten på bærene. Frukt trenger mye sol for å gjøre dem mer sukkerholdige. For denne stikkelsbærsorten vil det beste alternativet være en avstand mellom planter på ca 700 cm - 1 m. Hvis du planter stikkelsbærbusker i rader, bør det være en avstand på 1,4 til 1,8 m mellom radene. Slike planter plantes av ca. 0,5 - 0,6 m.
Etter at plantene dine er plantet i bakken, komprimerer du rotsonen godt. Når du planter stikkelsbærbusker, bør du ikke legge til ekstra gjødsel i plantegropene. Dette gjøres best etter at busken har slått rot. Ikke glem å vanne plantene godt etter planting, hvis jorden er lys nok og har en stor mengde sand i sammensetningen, vil forbruket per plante være omtrent 10 liter vann. Dette gjelder for planting på høsten. Hvis du planter busker om våren i tilstrekkelig fuktig jord, reduser vanningen med 2 ganger.
Stikkelsbærsort Malakitt: hvordan man pleier ordentlig

Stikkelsbær -malakitt: hvordan du pleier ordentlig
Omsorg for denne stikkelsbær -sorten er praktisk talt ikke annerledes enn landbruksteknologien til andre bæravlinger. Unge stilker, som tilhører den første orden, danner blomsterstilker om våren neste år. Av denne grunn må to år gamle skudd fjernes med jevne mellomrom, slik at det ikke er en for tett krone av busken. Regelmessig tynning av plantinger vil også minimere risikoen for forurensning av plantene dine med sykdommer og skadelige insekter. I tillegg viser ikke for tettvoksende busker de beste resultatene når det gjelder utbytte. Bærene blir for små og sure.
Care Algorithm for et stikkelsbær består av fire svært viktige punkter:
- Brukerstøtte.Siden stikkelsbær vokser ganske raskt, kan skudd med et stort antall bær ha en tendens til å falle til bakken. Av denne grunn er det viktig å skape en støtte for busker. Det enkleste alternativet er å knytte busken med hyssing i det øyeblikket planten bærer frukt. Imidlertid beskytter dette tiltaket plantene dine mot kontakt med jorda, hvor skadelige insekter kan finnes, samt unødvendige bakterier. Høsting med en slik støtte vil være upraktisk.
Du kan installere stive støtter rundt stikkelsbærbuskene, som vil ha en rund eller firkantet form. Diameteren på slike støtter bør være større enn selve busken. Som regel når en slik støtte i høyden 50 - 60 cm. Stikkelsbærskudd med en slik støtte støtter seg lett på stive strukturer.
Den mest vellykkede og populære måten å skape støtte for busken er å installere espalier. Dette alternativet er bra på mange måter.
- Topp dressing. Denne avlingen er i stand til å bære frukt i en lang periode hvis du periodisk tilfører næringsstoffer til jorden. Det er best å gjøre dette om høsten langs omkretsen av busken. Om vinteren, på grunn av at du har påført gjødsel på jorda, vil jordens sammensetning bli bedre. Til disse formålene brukes denne blandingen: superfosfat (50 gram) + ammoniumsulfat (25 gram) + kaliumsulfat (25 gram). Denne tørre blandingen må tilsettes til komposten. Det er bedre å foretrekke tørr dressing, dette skyldes at stikkelsbær elsker å absorbere mat sakte og jevnt. Toppdressing som er oppløst i vann vil ikke bli absorbert av stikkelsbær så godt. Før du sprer den forberedte toppdressingen nær busken, må du løsne overflaten på stammesirkelen. Etter 14 dager legger noen gartnere i tillegg til mulleinløsning. Ett anlegg står for 5 liter organisk gjødsel + 10 liter vann.
- Beskjæring av busker. Hvert år danner denne stikkelsbærsorten ytterligere 10-14 stengler. Skudd som er mer enn 5 år gamle om høsten må fjernes ved roten. Og de dannede skuddene i det første og tredje året må forkortes med 10 cm over rotkragen. For at buskene dine skal danne blomster godt, og fruktene skal være større, må du klype unge stilker om våren. For å gjøre dette må du kutte toppene med 10 cm. Der det var et kutt, må du behandle det med en hagelakk.
- Forbereder vintertid. På høsten, etter at du har kuttet av skuddene og påført gjødsel, må du klemme buskene og dekke rotsonen. Dette må gjøres før det kalde været setter inn. Selv om denne varianten er ganske motstandsdyktig mot lave temperaturer, vil tilleggsisolasjon ikke være overflødig. Så plantene vil våkne raskere, og dannelsen av unge stilker vil være vennlig. Når plantene har våknet etter vinteren, må du fjerne beskyttelseslaget og løsne jordoverflaten i rotsonen. Dette tiltaket vil bidra til å bli kvitt larvene til skadelige insekter som kan overvintre i nærheten av plantene dine. Mens larvene til skadelige insekter er i søvn, er det nødvendig å søle jorda med kokende vann, og også spray varmt vann over selve planten. Så stikkelsbærknoppene vil våkne raskere, og skadedyr vil ikke irritere stikkelsbæret ditt.
Hvordan forplante stikkelsbærmalakitt? Når det gjelder forplantning av busker, er det flere måter. For disse formålene bruker gartneren ofte lagdeling, stiklinger, frø. I tillegg kan du dele busken, og også bruke transplantater.
Om sykdommer og skadedyr av stikkelsbær Malakitt
Selv om den grønne stikkelsbær -malakitten har et ganske sterkt immunsystem, blir den noen ganger angrepet av forskjellige sykdommer og skadelige insekter.
De vanligste skadedyrene for stikkelsbær er bladlus, sagflue, møll, stikkelsbærmøl.
- For å forhindre at plantene dine kolliderer med stikkelsbærmøllen, er det nødvendig å periodisk legge et lag mulch på jorda, fjerne skadede frukter. Også erfarne gartnere bruker forskjellige infusjoner mot dette skadedyret, for eksempel basert på tomatblader, sennep, treaske. Når det gjelder kjemikalier, bruker mange gartnere Karbofos, Iskra, Aktellik, Fufanon.
- For at sagfluen ikke skal forårsake ubehag for buskene dine, må du regelmessig fjerne gamle skudd, mulch jorda. Det er også nødvendig å søle rotsonen med kokende vann i begynnelsen av våren. Fitoverm og bakhold er veldig populære blant kjemikalier.
- Mot bladlus på stikkelsbærbusker brukes en infusjon av aske eller tobakk. Busker vannes med slike midler. Mange gartnere bruker medisiner som Decis, Bitobaxibacillin.
- Kinmix brukes mot møllen.
Det er verdt å merke seg at kjemikalier bare skal brukes i de mest ekstreme situasjonene. Dette gjelder spesielt perioden da planter danner frukt. Etter at plantene er blitt behandlet med kjemikalier, kan bær høstes tidligst 14 dager senere. Samtidig må bærene vaskes godt før bruk.
Når det gjelder sykdommer, har denne sorten en sterk immunitet mot mugg, men andre sykdommer kan forekomme på planter.
Hvis du ser brune flekker på plantens løvverk, er det mest sannsynlig septoria. sink, borsyre og mangansulfat brukes ofte mot denne sykdommen.
Ofte påvirkes grønn stikkelsbær Malakitt av antraknose. denne sykdommen kan gjenkjennes av den mørkebrune fargen på bladene. Over tid begynner de å falle av. For å overvinne denne sykdommen kan du bruke en løsning av kobbersulfat.
Når det gjelder begerrust, er dette også en ganske populær sykdom blant stikkelsbæravlinger. En slik sykdom bestemmes ved å undersøke innsiden av plantens løvverk. Der dannes sporer med en rød farge, over tid krøller bladene, og bærene deformeres. Bekerrust kan helt drepe en busk på ganske kort tid. Bordeauxblanding brukes som et kontroll- og forebyggende tiltak.
Stikkelsbær -malakittvideo