Når og hvordan å plante clematis i åpen mark.
Innhold:
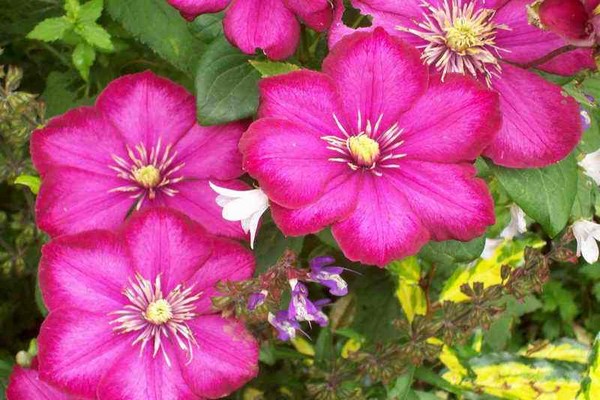
Clematis kan fortjent kalles kongen i hagen. De nydelige blomstene kan dekorere absolutt alle områder, det er ganske enkelt umulig å ikke bli forelsket i det. Blant menneskene blant klematis er det flere flere navn, "Lomonosy" og "Knyazhki". Det er flere og flere varianter av klematis hvert år, oppdrettere jobber hele tiden med å øke dem. Clematis kan også formeres på flere måter: ved stiklinger, deling av busk, frø og lagdeling. Clematis blomster kan være av forskjellige typer, størrelser og farger. Når det gjelder forplantning ved hjelp av frø, er denne metoden bare egnet for de varianter med blomster med liten diameter. Faktisk er disse vinstokkene veldig enkle å dyrke, selv om det ved første øyekast kan virke som om det ikke er slik. Denne flerårige vintreet kan dekorere selv den mest dystre hagen. Denne planten, som alle andre, har sine egne plante- og omsorgsregler som må følges når man dyrker en frøplante.
Kort om klematis.
For at planten din skal være vakker og sunn, må plantematerialet vedlikeholdes riktig. Plantematerialet har også helt forskjellige former: plantene har et lukket rotsystem. I utgangspunktet er dette frøplanter som allerede er ett år gamle. Svært ofte selges disse plantene umiddelbart i potter.
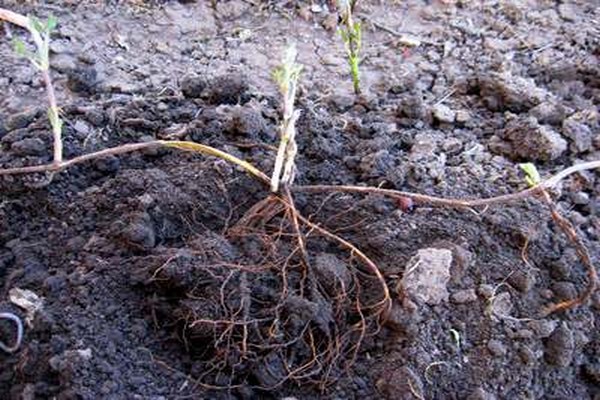
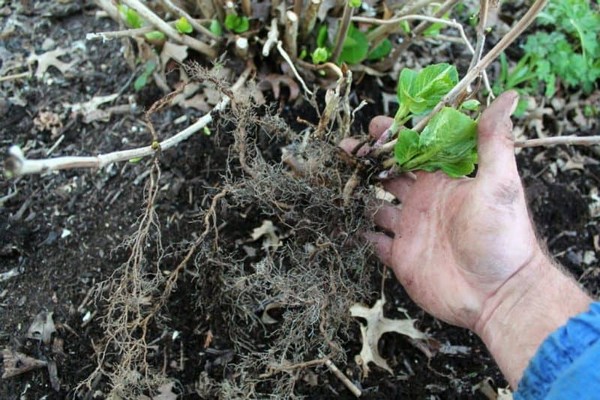
Skudd er også ofte allerede forankret, men med et åpent rotsystem. For det meste selges de bare i en pakke. Ofte er røttene lett støvet med torv.
Selvfølgelig, hvis du har et valg, er det best å kjøpe frøplanter hvis rotsystem er lukket. Disse plantene vil bli vant til det mye raskere og slå rot på et nytt, permanent sted. En slik plante vil også utvikle seg mye bedre og mer aktivt enn en frøplante med et åpent rotsystem.
Den beste tiden å plante en plante som klematis er våren. Det er tidsfrister for dette. Plantering bør skje selv om det ikke kommer noen gjentatte vårfrost, fordi de er farlige for absolutt alle planter som nettopp har blitt plantet. Det lider veldig mye av dette nettopp fordi planten allerede er under veldig sterkt stress og definitivt ikke har hatt tid til å komme seg. Frøplanten har definitivt ikke hatt tid til å slå rot. I beste fall, hvis frøplanten bare lider litt, i verste fall kan du bare miste den. Når du planter om høsten, kan frøplanten rett og slett ikke ha tid til å komme seg og slå rot før begynnelsen av den første frosten. Selv om en ung plante har tid til å tilpasse seg og overleve stresset etter transplantasjon, er den fremdeles ikke sterk nok og har en veldig høy risiko for å fryse ut om vinteren, selv til tross for all oppvarming for vinteren.
Store kjøpte, rotfestede stiklinger av clematis før vårplanting må være riktige. Generelt er frøplanter av to typer: med et åpent rotsystem og et lukket rotsystem.
Alt om frøplanter.
Faktisk er det veldig enkelt å bevare planter, men du må definitivt kjenne alle funksjonene. I utgangspunktet må frøplanter med et åpent rotsystem tas ut av en torvpose og undersøke røttene nøye. Hvis noe er galt med røttene, blir det lagt merke til noen skader eller råte, så må du ta en skarp saks og kutte av de syke røttene. Etter at røttene er kuttet, må de dynkes i soppdrepende midler. Slike legemidler som "Maxim", "Fitosporin - M" er veldig populære for dette, men det er andre, de må brukes strengt etter instruksjonene som er vedlagt hvert legemiddel.Og du kan kjøpe dem i enhver hagebutikk.
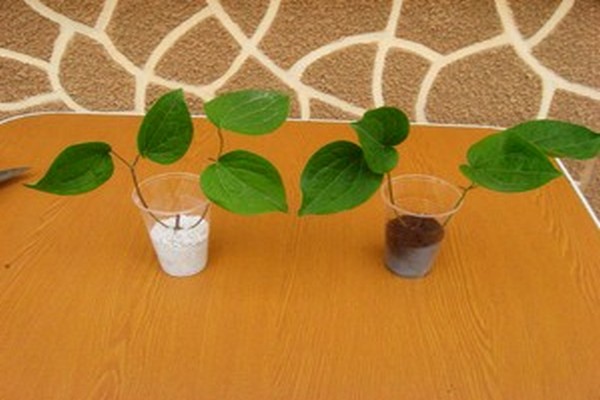
En kontrollert og om nødvendig behandlet frøplante eller stilk må transplanteres i en liten beholder, det er ønskelig at den er av plast og det er hull i bunnen slik at overflødig vann renner ut gjennom dem ved vanning. Landet der skjæringen vil vokse før planting i åpen mark må være fruktbar. Om våren, når været er varmt nok ute, skal skjæringen begraves i hagen rett i en plastbeholder, der den vil bli et helt år. I løpet av dette året vil stilken kunne utvikle seg riktig og vokse et rotsystem av ønsket størrelse. Etter et år kan en ferdig og tilstrekkelig sterk frøplante transplanteres til et permanent sted, hvor alt den trenger er riktig pleie.
I prinsippet kan du plante en frøplante i åpen mark umiddelbart uten en beholder, men i dette tilfellet må det utføres mer forsiktig omsorg for det, fordi frøplanten i dette tilfellet blir svakere og mer krevende.
Men når plantesystemets rotsystem er lukket, er det best å skaffe det ikke tidligere enn en måned før planting, og best av alt et par dager før planting, men naturligvis hvis det er en slik mulighet. Hvis du vil at den tidligere kjøpte frøplanten skal være godt bevart til vårplantingen, må du følge noen regler: etter at frøplanten er kjøpt, må den stå i skyggen og avkjøles i flere dager. Etter det skal potten med frøplanten plasseres i solen. Disse handlingene er relevante ikke bare for den kjøpte frøplanten, men også for stiklinger.
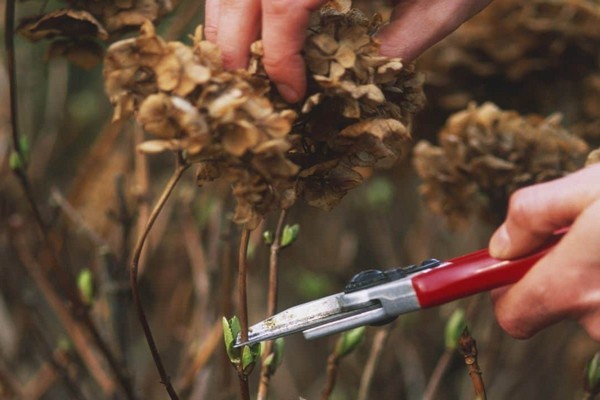
Hvis knopper allerede har dukket opp på frøplanten ved kjøpet, må de fjernes med et skarpt verktøy. I intet tilfelle skal du synes synd på dem, for hvis de blir værende, vil det bli mye vanskeligere for frøplanten å venne seg til og slå rot på et nytt sted, for i stedet for å legge all sin styrke i gjenoppretting og roting, vil frøplanten vil bli distrahert av utviklingen av disse knoppene. På grunn av dette vil det derfor gjøre mye lenger vondt, og deretter komme seg i veldig lang tid.
Vann planten regelmessig, men ikke mye. Bakken skal være konstant lett fuktig.
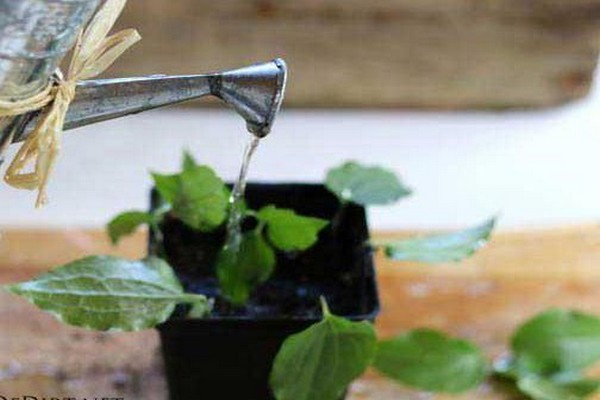
En gang i uken må planten vannes og sprayes med et soppdrepende middel. Dette er nødvendig for å gjennomføre sykdomsforebygging. På denne måten kan du behandle ikke bare frøplanter, men også stiklinger.
Hvis du likevel kjøpte en frøplante med et lukket rotsystem mye tidligere enn plantingsdatoen, er den naturligvis allerede plantet i en liten krukke, men den må umiddelbart transplanteres i en større beholder, hvor fruktbar og befruktet jord helles. I en større beholder vil frøplanten føles mer behagelig.
Hvis frøplanten av en eller annen grunn begynte å falme, vil fôring bidra til å bringe den til en sunn tilstand. Det er best å gjødsle planten ved hjelp av kompleks gjødsel, for eksempel: "Agricola", "Fertika-Lux", "Biohumus", disse preparatene bør brukes i full overensstemmelse med instruksjonene som følger med dem.
Planting om våren.
Clematis plantes best utendørs om våren. Men mange gartnere som ikke hadde tidligere erfaring lurer på når dette skal gjøres?
Den beste tiden å lande i åpen mark er fra andre halvdel av april til andre halvdel av mai. Du må velge en mer nøyaktig landingstid individuelt, avhengig av det lokale klimaet i din region.
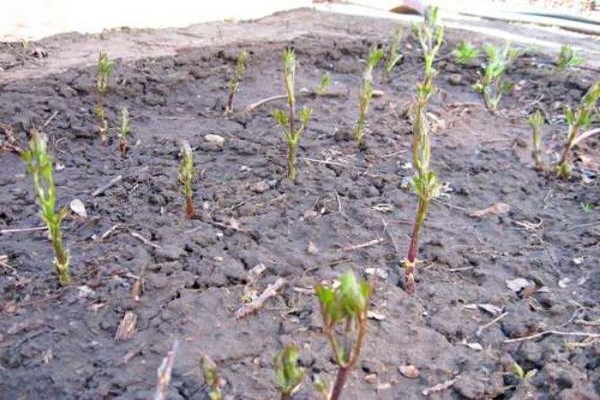
Hvis frøplanten din har et lukket rotsystem, kan planting ikke bare utføres om våren, men også på høsten. Og sommeren er fin for ham. Men de med et åpent rotsystem trenger bare å bli plantet om våren, og dette kan bare gjøres til plantens knopper har tid til å hovne opp.
Mange gartnere, når de planter planter, følger ofte månekalenderen.Ved månens syklus kan du finne ut nøyaktig på hvilke dager plantingen av planten vil være gunstig, og på hvilke det er best å nekte å plante. Hvert år er tallene for planting forskjellige, så det er best å kjøpe en kalender i tide.
Før du planter klematis i åpen mark, er det best å studere all informasjon om hvordan du gjør dette. Tross alt avhenger det av riktig planting hvordan planten din vil vokse i fremtiden.
Først må du velge riktig sted. Det avhenger av hvordan planten din vil utvikle seg, blomstre og generelt vokse i fremtiden. Alle stadier av blomsterutvikling avhenger av det valgte stedet på nettstedet ditt, og hva slags land det er på det. Dette må tas med fullt ansvar, fordi klematis ikke liker transplantasjoner i det hele tatt. Stedet for planting av clematis skal være solfylt, men strålene skal ikke være direkte, men litt spredt. Hvis din liana har blomster med lyse farger, er det best å dyrke den i en liten nyanse, i solen kan lyse farger falme og falme.
Stedet hvor clematis vil vokse må være fullstendig beskyttet mot vind og trekk.
Ikke plant klematis i et lavland, denne planten vil definitivt like den mer på en ås. Vann bør ikke stagnere på stedet heller, ellers er det stor risiko for at rotsystemet til klematis kan begynne å råtne, og du risikerer å miste planten helt.
Det må være ledig plass i nærheten av plantegropen, det er nødvendig slik at i fremtiden, når vintreet vokser nok, vil det være mulig å installere en støtte som er nødvendig for enhver klatreplante. Og dette er nødvendig for at plantestammen ikke skal gå i stykker, fordi vintreet er en veldig lang plante og uten støtte kan den rett og slett knekke.
Hvis du bestemmer deg for å plante klematis ved siden av et gjerde eller en slags bygninger, må du huske på at avstanden fra dem må være tilstrekkelig for at rotsystemet skal utvikle seg ordentlig.
Du bør aldri plante planter ved siden av metallgjenstander. Og dette gjelder ikke bare clematis, men andre også. Et slikt nabolag kan veldig skade planter, fordi metallet kan bli veldig varmt, om sommeren kan det bare brenne ut og fryse ut om vinteren.
For riktig utvikling av anlegget må landet på stedet være fruktbart, løst og lett. Men definitivt ikke surt, fordi klematis ikke tåler det.
Clematis vil føle seg bra hvis du planter den i en forhøyet posisjon. I tillegg til at selve planten vil føle seg bra i dette tilfellet, og rotsystemet aktivt vil utvikle seg og unngå å råtne, noe som kan oppstå ved planting i et lavland, fordi vann ofte stagnerer på slike steder. Dette er spesielt farlig under regn, så vel som på våren, når snøen begynner å smelte.
Clematis er veldig egnet for å dekorere et lysthus i tre, buer eller som en hekk.
Før du planter klematis, må plantegropen forberedes på forhånd, minst en måned i forveien. Dette er nødvendig for at jorden skal bosette seg.
Det første trinnet er å forberede stedet til gropen. Det må rengjøres fullstendig og alt ugress fjernes fra det. Hvis jorda er sur, må den nøytraliseres. Vanlig treaske, dolomittmel eller et spesielt preparat for deoksidasjon vil perfekt klare dette, hvis du bruker preparatet, må du følge instruksjonene. Ethvert stoff må tilsettes til den gravde jorden, og det er viktig å jevne det ut slik at stoffet blir jevnt fordelt.
Med tung jord er det best å legge torv eller sand til det, dette vil gi det letthet og til og med fruktbarhet.
Hvis jorden tvert imot er for lys, må den rett og slett tynges ned med tilsetning av vanlig torvjord til plantegropen.
Gropen for planting av klematis bør være minst en halv meter i bredde og dybde.
Det må være et dreneringslag i bunnen av gropen.Nesten alt materiale er egnet for dette, og ødelagte murstein, steiner, grus, etc.
Selve gropen må fylles i to med en jordblanding av jord, sand, torv, alle disse ingrediensene skal være i forholdet 1: 1: 1.
Før du planter i hullet, kan du også legge til en mineralsk kompleks gjødsel. Etter at du har lagt til gjødsel, må jorden vannes slik at gjødsel trenger så dypt som mulig, og jorden legger seg samtidig.
Når du planter flere planter samtidig, bør avstanden mellom dem være minst en meter.
Før plantingen må frøplanten være riktig forberedt, men dette gjelder bare de hvis rotsystemet er åpent. Frøplanter med lukket rotsystem trenger ikke å være forberedt på forhånd.
Omtrent en dag før du planter planten din, må du suge den i ethvert preparat som vil stimulere veksten av rotsystemet. Hvis det er problemer med røtter, mugg, råte, etc., må de trimmes med et skarpt verktøy og behandles med et soppdrepende middel.
Plantens rotkrage må begraves litt, så hvis det er blader over den, må de fjernes.
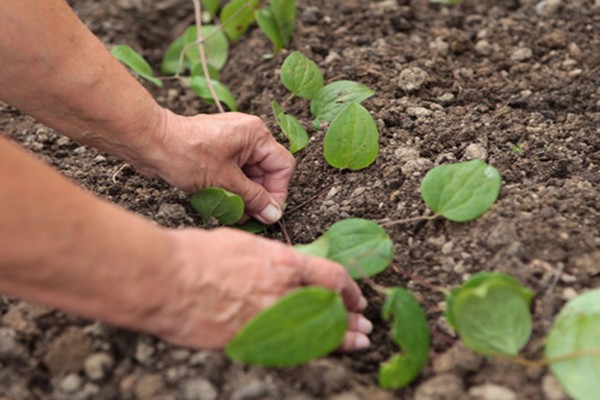
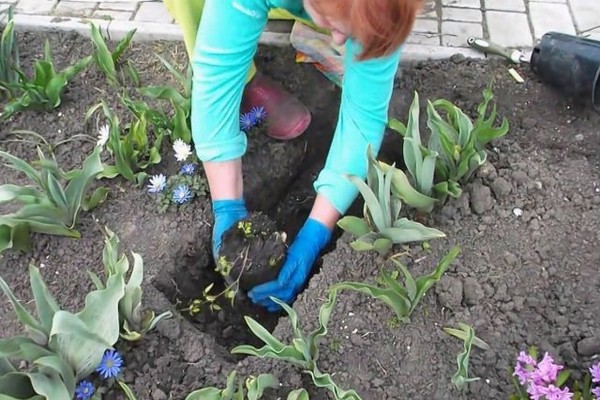
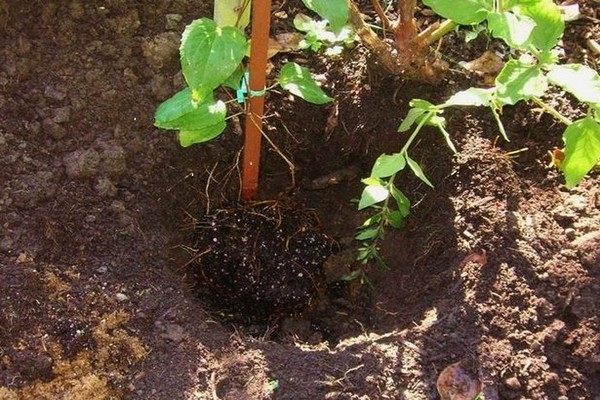
Etter at gropen og selve frøplanten er forberedt, kan du fortsette direkte til plantingen. For dette er det nødvendig at jorden i gropen allerede var tett, det vil si avgjort. Frøplanten skal plasseres i midten av hullet og dekkes forsiktig med jord slik at rotkragen er ca 10 cm dyp. De to første knoppene skal også være i bakken. Helsen til planten din avhenger direkte av dette. Med en slik planting vil planten ha en mer stabil immunitet og mer korrekt utvikling.
Etter at frøplanten er installert og dekket med jord, må den være godt stampet. En grunne grøft skal graves rundt anlegget.
Etter det må planten vannes rikelig.
Etter tiltakene må en innsats installeres i nærheten av frøplanten, og planten må bindes til den, og den må stå slik til øyeblikket for fullstendig forankring.
Det er best å klippe jorden rundt frøplanten. For dette kan tørt eller råtnet sagflis, torv og andre materialer være egnet.
Etter å ha plantet en frøplante, kan den også dekkes, dette gjøres for å beskytte den mot gjentagende frost.
Etter at clematis er plantet, må den pleies ordentlig. Handlingene er ganske enkle, men fremtidens liv og utvikling av planten din avhenger direkte av dem. Men klematis krever mest av alt oppmerksomhet i det første leveåret i det åpne feltet.
Avreise etter landing.

Naturligvis er planten etter transplantasjon veldig stresset og trenger hjelp. I løpet av den første måneden etter planting må planten være dekket fra solen; det vil være mulig å la den være i fred etter at frøplanten er fullstendig rotfestet. For å dekke anlegget mer praktisk, er det best å installere buer over det.
Vanning av klematis i det første leveåret må også være veldig forsiktig. I intet tilfelle bør du vanne planten ved roten, dette kan bare gjøres i en grøft rundt den, husk at den bør gjøres på plantetidspunktet. Vanning bør være regelmessig, men i moderate mengder. Vannet skal naturligvis ikke stagnere. Den beste vanningsplanen. I normalt vær er det en gang i uken, og i ekstrem varme eller tørke, ikke mer enn 3 ganger i uken.
Det er best å kappe etter planting. Mulching vil kvitte seg med fordampning av fuktighet fra bakken, og vil også kvitte deg med unødvendig ugress.
Planter med en skarp lukt kan plantes ved siden av clematis. Dette er nødvendig for å skremme skadelige insekter som kan tiltrekkes av klematis.
Landet rundt anlegget må løsnes og ugress fjernes fra det. Takket være dette vil oksygen tilføres røttene i den nødvendige mengden.
I det første året av plantens liv er det viktig å beskjære om høsten. Dette gjøres slik: absolutt alle skudd må kuttes av og forlate 30 cm fra bakken.I de påfølgende årene kan beskjæring utføres etter utviklingen av planten.
Om vinteren må planter isoleres, siden det i mange regioner er fare for at planten fryser om vinterens frost.
Vokser fra frø.
Clematis kan også dyrkes fra frø. For å gjøre dette må du først så frøplanter. Men å dyrke planter fra frø vil være ganske vanskelig og krever mye innsats. I utgangspunktet vil frøene kreve forberedelse, og selve frøplanten vil ta mye tid. Ja, og bare visse typer klematis kan dyrkes fra frø, som har blomster med liten diameter. Når det gjelder hybridsorter, eller de varianter som har veldig store blomster. Det vil definitivt ikke være mulig å dyrke slik klematis fra frø, til tross for all din innsats.
Generelt er det absolutt ingenting vanskelig å plante slike planter som clematis, men her, som andre steder, er det noen nyanser. Du må ta vare på plantene riktig, men siden klematis i seg selv ikke er finurlig, består all omsorg i luke, løsne, vanne og mate, og absolutt enhver gartner kan takle denne oppgaven, selv en som absolutt ikke har erfaring. Hvis du gjør alt som det skal og bruker litt av tiden din til planten, så vil hagen snart glitre av nye, lyse farger. En plante som klematis kan enkelt dekorere selv det mørkeste området, eller et kjedelig hjørne av hagen din.